Starting a new career is an investment, and in California, the barrier to entry for real estate is relatively low. Naturally, finding an affordable path is a top priority for many students—whether you Read more...
Starting a new career is an investment, and in California, the barrier to entry for real estate is relatively low. Naturally, finding an affordable path is a top priority for many students—whether you are a career-changer, a busy parent, or a full-time worker.
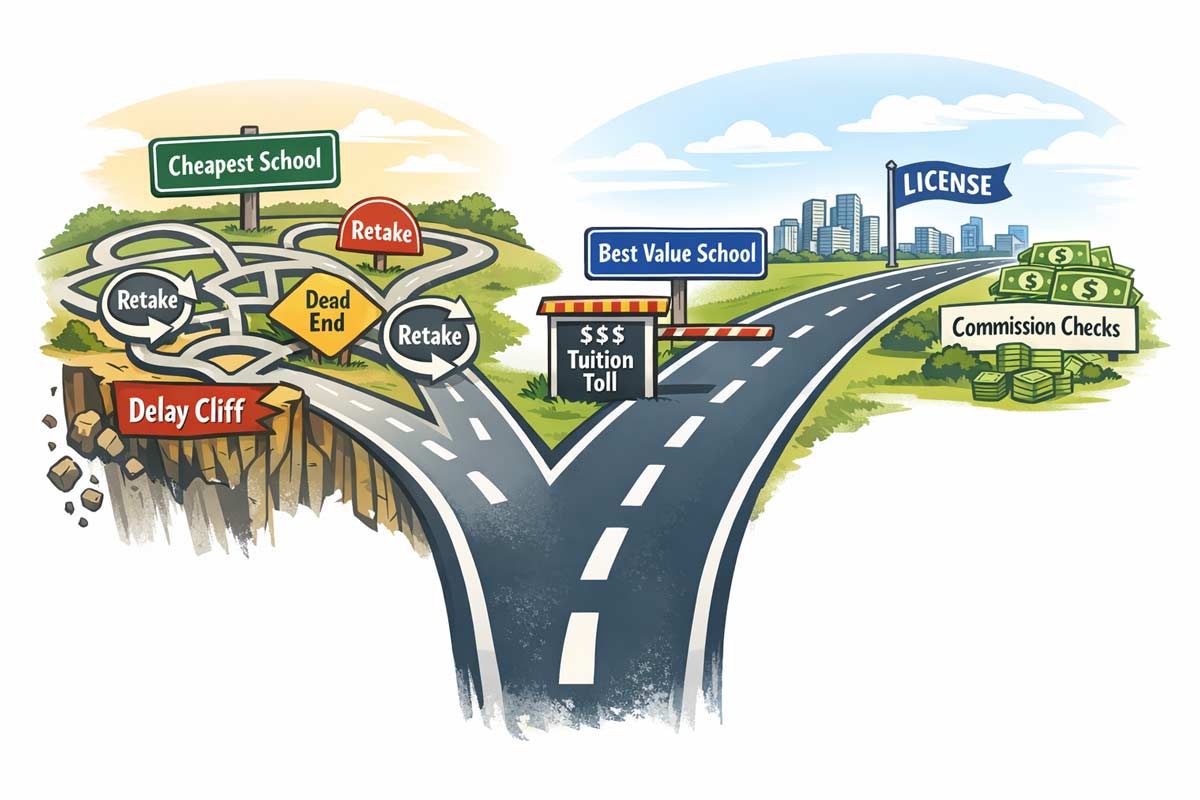
However, after 20 years of helping students navigate the California Department of Real Estate requirements, I’ve seen a consistent pattern: the "cheapest" school on paper can often become the most expensive in terms of time and frustration.
The goal isn't just to find the lowest checkout price; it’s to find the lowest total cost to get your license in your hand and start earning commissions.
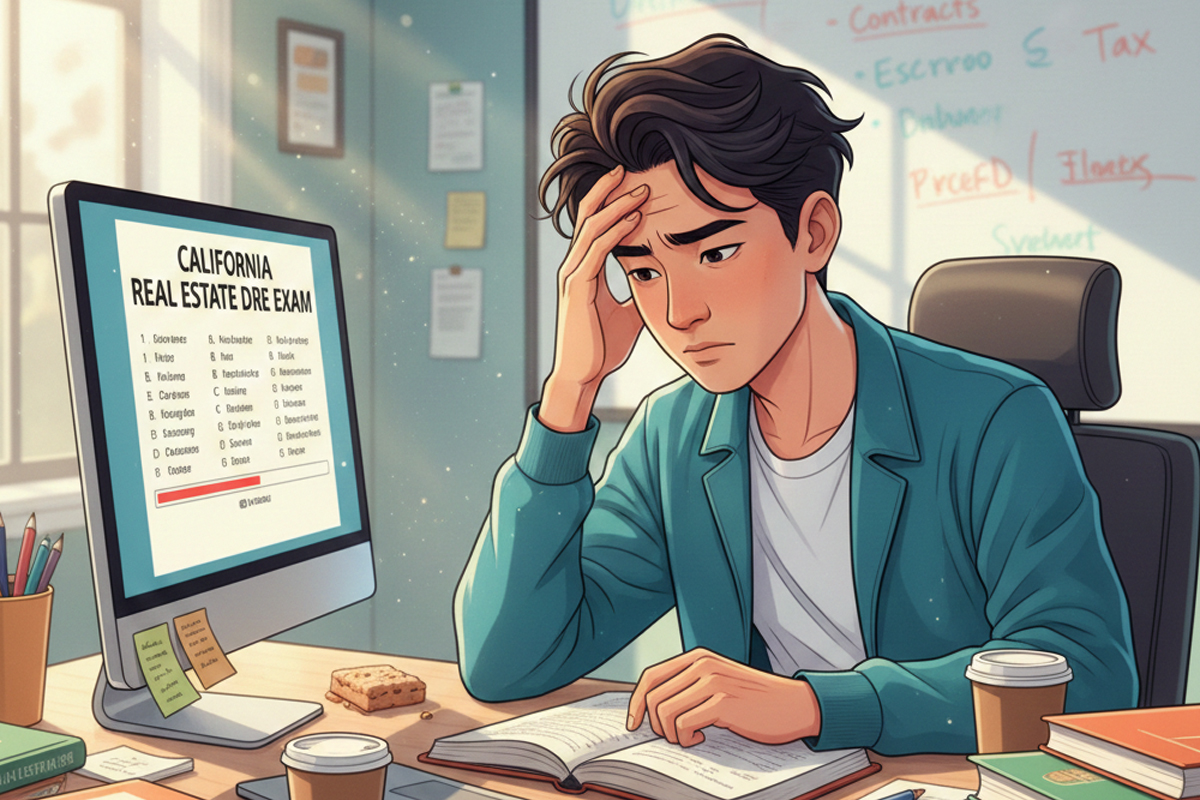
What is the cheapest real estate school in California?
The Short Answer: The cheapest real estate schools in California are typically 100% self-paced, online programs that provide the mandatory 135 hours of DRE-approved coursework with minimal instructor support. While you will sometimes see these "budget" packages advertised for under $150, the real value is found by balancing the sticker price against support quality and exam prep depth to avoid the high costs of retakes and study delays.
What "Cheap" Really Means in Real Estate Education
When you see a price that seems too good to be true, it’s usually because the school has "unbundled" the experience. To offer a rock-bottom price, schools often cut the very things that help students actually finish.
Common characteristics of ultra-budget programs include:
Minimal Instructor Access: You are often left to learn the material entirely on your own with no one to ask when a complex concept like "Joint Tenancy" or "Agency Disclosure" gets confusing.
Limited Exam Prep: The 135 hours of required education is not the same as passing the state exam. Cheap programs often provide the bare minimum to meet legal requirements but leave you hanging when it comes to the actual test.
Slow Support Response: If you have a technical issue or a question about your certificate, a budget school might take days to respond.
Hidden Fees: Watch out for "add-ons" for proctoring fees, certificate processing, or course extensions if you don't finish within a tight window (e.g., 90 days).
The "True Cost" Framework
To evaluate if a school is actually a bargain, you have to look past the "Add to Cart" button. Use this framework to calculate the real investment required.
Cheap vs. Best Value: What Changes?
Feature
Ultra-Budget Program Pattern
Best-Value Program Pattern
Why it Matters
Support
Email only (24–48 hour delay)
Phone/Live Chat/Direct Access
Delays in answers lead to "study stall-outs."
Exam Prep
Basic PDF or none included
Simulated exams & video reviews
Passing the state exam the first time saves money on retakes.
Platform
Older, non-mobile friendly
Modern, responsive interface
If you can't study on your phone, you won't study as often.
Accountability
None (Self-study only)
Optional live sessions/reminders
Students in ultra-budget courses often stall out without structure.
Pros of Choosing the Cheapest Option
There are absolutely times when going for the lowest price is a smart, tactical move.
Lowest Upfront Spend: If cash flow is the primary barrier to entry, a budget program gets you into the system for the least amount of money today.
Maximum Flexibility: These programs are almost always self-paced, which is perfect for someone working a 60-hour week who can only study at 2:00 AM.
Great for Self-Motivated Learners: If you have a history of teaching yourself complex subjects and don't need a "coach," you can save money here.
Existing Support Systems: If you already have a mentor at a brokerage (or a family member in the business) teaching you the ropes, you may simply need a DRE-approved provider to log the required hours efficiently. For the full decision framework, see Best Real Estate Schools in California.
The Risks: When "Cheap" Becomes Expensive
In my experience, I’ve seen three "failure modes" for students who choose a school based solely on price:
The 9-Month Delay: A student buys a budget course, hits a boring chapter, has no one to talk to, and stops studying. Months later, the course expires, and they have to pay a "re-enrollment fee" just to start over.
The Retake Loop: A student finishes a cheap program but fails the state exam multiple times because the prep resources didn’t match the depth or style of the state exam. They end up spending more in DRE re-application fees.
The Tech Wall: The program doesn't work well on mobile devices, meaning they can only study when sitting at a desktop. This friction often leads to students giving up entirely.
What this means for you: If a $100 savings on tuition leads to a three-month delay in starting your career, you’ve actually "lost" thousands of dollars in potential commissions.
Decision Filter: Which Path is Yours?
You’re a good fit for the cheapest option if…
You are highly disciplined and never struggle with procrastination.
You are a "natural" test-taker who rarely needs extra help.
You are on a very strict budget and are willing to trade your time for a lower price.
You should pay for more support if…
You haven't taken a professional exam in several years.
You learn better by hearing and seeing rather than just reading.
You want a structured schedule to keep you on track.
If you find that you need more structure, you might look into the best online real estate schools in California that offer livestream options to keep you accountable.
How to Get the Lowest Price Without the Risk
If you are determined to go the budget route, follow these steps to protect your investment:
Verify DRE Approval: Never pay a dime until you verify the school on the DRE’s official list of approved education providers.
Check the "Format Fit": While self-paced is often the affordable online option, some schools offer "hybrid" models that provide a middle ground.
Audit the Exam Prep: Does the "cheap" price include a practice exam? If not, factor in the cost of a third-party prep tool later.
Look for "Hidden" Popularity: Sometimes the most popular real estate schools in California are affordable because of their high student volume, not because they cut corners on quality.
Set a Milestone Plan: Don't just "wing it." Commit to finishing one module every few days to ensure you don't hit expiration fees.
Cheapest by Format
Self-Paced Online: Always the lowest sticker price. Best for the "lone wolf" student.
Live Online / Livestream: Moderate price. This is often the fastest real estate license program because the fixed schedule prevents procrastination.
In-Person: Usually the highest cost. You are paying for the physical facility and the instructor's presence. However, the best in-person real estate schools in California often create higher completion momentum because the structure is built in—fixed times, real-time accountability, and fewer distractions.
FAQ
What is the cheapest way to get a real estate license in California?
The cheapest way is typically an online, text-based, self-paced course package. These packages cover the three required courses for a single flat fee.
How much do real estate schools cost in California?
You’ll commonly see pricing from roughly $125 for basic self-study to $900+ for in-person or premium livestream packages with heavy coaching.
Are cheap real estate schools DRE-approved?
Most are, but you must verify. If a school is not on the DRE's approved list, the state will not recognize your education, making the course a total loss.
How long does it take to finish the 135 hours?
Per DRE rules, a statutory course requires a minimum of 18 days of study before the final exam can be taken. For all three courses, the fastest you can legally finish is 54 days. Any program implying completion faster than that should be double-checked for compliance.
Cheap is a Tool
Choosing a real estate school is your first business decision as a future agent. If you have more time than money, a budget-friendly school can be a great tool. Just be sure you aren't sacrificing the support you need to actually pass the exam and start your career.
If you're still not sure which direction to head, check out our comprehensive guide to the Best Real Estate Schools in California to compare your options.
|
Choosing an online real estate school can feel like an endless loop of open tabs and conflicting opinions. And in real estate licensing, “close enough” isn’t close enough—if you enroll in a program Read more...
Choosing an online real estate school can feel like an endless loop of open tabs and conflicting opinions. And in real estate licensing, “close enough” isn’t close enough—if you enroll in a program that’s hard to use, light on support, or weak on exam prep, you don’t just lose money.
You lose momentum.
Over the last 20+ years, I have seen the same truth play out: the “best” online school isn’t a universal winner. It’s the one that fits how you actually learn and how your life actually runs. In the next 10 minutes, you’ll know which online format fits you, what to verify for compliance with the California Department of Real Estate, and which tradeoffs matter most—support, speed, or exam readiness.
What “Online” Really Means in 2026
In California, “online” can mean very different study experiences depending on the delivery method:
Self-Paced Online: Log in anytime. Move through modules/videos on your schedule. Maximum flexibility—requires self-discipline.
Livestream / Virtual Classroom: Scheduled sessions (often via Zoom-style platforms). Best for accountability and real-time instructor access.
Hybrid Programs: Self-paced core hours + optional live Q&A, crash reviews, or office hours to reinforce understanding.
Mobile-First Platforms: Purpose-built mobile study vs. “mobile responsive.” If you study during commutes or breaks, mobile usability becomes a deciding factor.
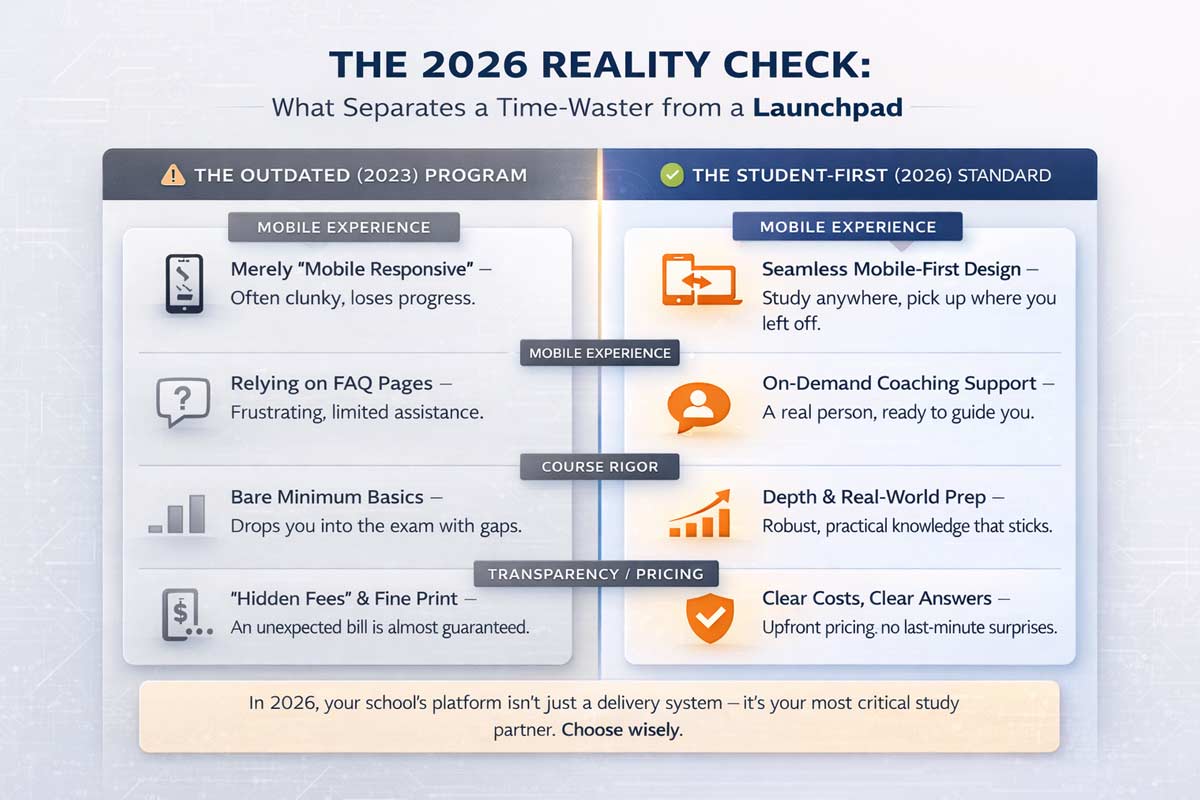
What’s Different About Online Schools Now (2026 Reality Check)
Three things separate “just acceptable” programs from programs that actually help students finish and pass:
Mobile-first study is no longer optional. The best programs let you move seamlessly between laptop and phone without losing your place.
Support quality varies wildly. “Support” is a buzzword unless you can reach a real person quickly when you’re stuck.
Course rigor matters more than ever. The DRE approves individual statutory courses and assigns sponsor IDs/approval numbers—so “thin,” outdated, or sloppy delivery isn’t just annoying; it creates avoidable exam friction.
The 2026 Rankings Framework: Finding Your “Best”
Instead of pretending there’s one perfect school for everyone, use this outcome-based framework. Find the category that matches your situation, then choose the program that checks the right boxes.
0. Best Overall for Most Students (The Balanced Choice)
What to look for: A structured path, real human support, strong real estate exam prep, and a clean user experience.
Red Flags: Unclear support channels, short access lengths (too little runway if life gets busy), and constant upsells for basics.
1. Best for Maximum Support (The “I Have Questions” Choice)
What to look for: Direct instructor access, weekly live Q&A, and a responsive student success team.
Red Flag: Ticket-only support with slow turnaround times when you’re on a deadline.
2. Best for Fast Completion (The “I Need This Done” Choice)
What to look for: A streamlined interface, clear progress tracking, and a smooth certificate process (no bottlenecks).
Red Flag: Clunky navigation that turns study time into frustration time.
Deep Dive: If speed is your primary driver, read the deeper breakdown here: Fastest Real Estate License Programs in California.
3. Best for Exam Prep Strength (The “One-and-Done” Choice)
What to look for: High-volume practice questions, exam-style simulations, and strong explanations (not just “right/wrong”).
Red Flag: Exam prep treated as a “bonus” instead of an essential part of passing.
4. Best for Budget-Focused Students (The “Value” Choice)
What to look for: Transparent pricing and packages that clearly include your required courses.
Red Flag: Teaser pricing that later charges extra for key items (certificates, support, prep tools).
Deep Dive: Before you pick the lowest sticker price, read the tradeoffs here: Cheapest Real Estate Schools in California (Pros & Cons).
🔶 The ADHI Standard (What a “Student-First” Program Should Include)
This isn’t about hype—it’s about what actually helps students finish. It’s also how ADHI designs programs internally:
Clarity: A step-by-step study path so you’re never guessing what’s next.
Support: Real help when you’re stuck (not a black-hole ticket system).
Prep Depth: Enough practice to build confidence before exam day.
Usability: Mobile-friendly study that fits into a working schedule.
No Surprises: Transparent inclusions so you’re not nickel-and-dimed later.
Use that as your checklist when comparing options—no matter what provider you’re looking at.
📘 Related Guides
Best In-Person Real Estate Schools in California
Cheapest Real Estate Schools in California (Pros & Cons)
Fastest Real Estate License Programs in California
Most Popular Real Estate Schools in California (Student Volume)
The Non-Negotiables Checklist
Quick note: the DRE approves individual statutory courses (and assigns sponsor IDs/approval numbers). Always verify the course approvals—not just marketing claims.
DRE Course Approval: Verify the specific course approval/sponsor ID in the DRE database (secure.dre.ca.gov).
Statutory Hours: Ensure the program satisfies the required 135 hours of statutory coursework.
Device Compatibility: Does it work smoothly on phone + laptop (without glitches)?
Access Duration: Enough time to finish without stress (6–12 months).
Refund Policy: Clear, written, and easy to find.
Online vs. In-Person: The Final Decision
A lot of students start by looking for the Most Popular Real Estate Schools in California, but popularity doesn’t guarantee fit.
Choose online if you need schedule flexibility and you’re comfortable learning independently. Choose in-person if you need a structured environment to stay consistent.
To compare online, in-person, cheapest, fastest, and popularity-based options side-by-side, use our Best Real Estate Schools in California hub.
FAQ
Is online real estate school allowed in California?
Yes—California allows pre-license/statutory coursework to be completed through approved offerings, including online formats, as long as the course is properly approved/listed. (California Department of Real Estate)
How do I verify DRE approval?
Use the DRE statutory course search and confirm the specific course approval and sponsor details. Remember: DRE approval is tied to courses (with sponsor IDs/approval numbers), not blanket marketing claims. (California Department of Real Estate)
Self-paced vs. livestream—what’s better?
Self-paced is best for flexibility. Livestream is best for accountability and real-time Q&A. Hybrid works well if you want both.
Can I finish faster online?
Online programs can help you move efficiently because you aren’t waiting for scheduled class dates. That said, California rules limit how quickly statutory courses can be completed: a single course may not be completed in less than 2½ weeks, and no more than two courses may be completed in any five-week period. (California Department of Real Estate)
Does an online school include exam prep?
It varies. Some include robust prep tools in the base package; others treat it as an add-on. If you want to pass with fewer attempts, prioritize programs in the “Exam Prep Strength” category.
How long do I have access to the course?
Access lengths vary by provider. The key is to choose enough runway so you don’t feel forced to rush if work or life gets busy.
Key Takeaways
Verify course approval (not marketing). Confirm sponsor/course approvals in the DRE database.
Choose the format that matches your life. Self-paced vs. livestream vs. hybrid is the real decision.
Exam prep is what gets you across the finish line. Courses earn credit; prep earns confidence.
Avoid surprise fees and weak support. Transparent inclusions + real help matter.
Plan your timeline around DRE pacing rules. 2½ weeks per course; max two courses per five weeks.
Ready to choose?
Compare online, in-person, cheapest, fastest, and popularity-based paths in our Best Real Estate Schools in California hub.
|
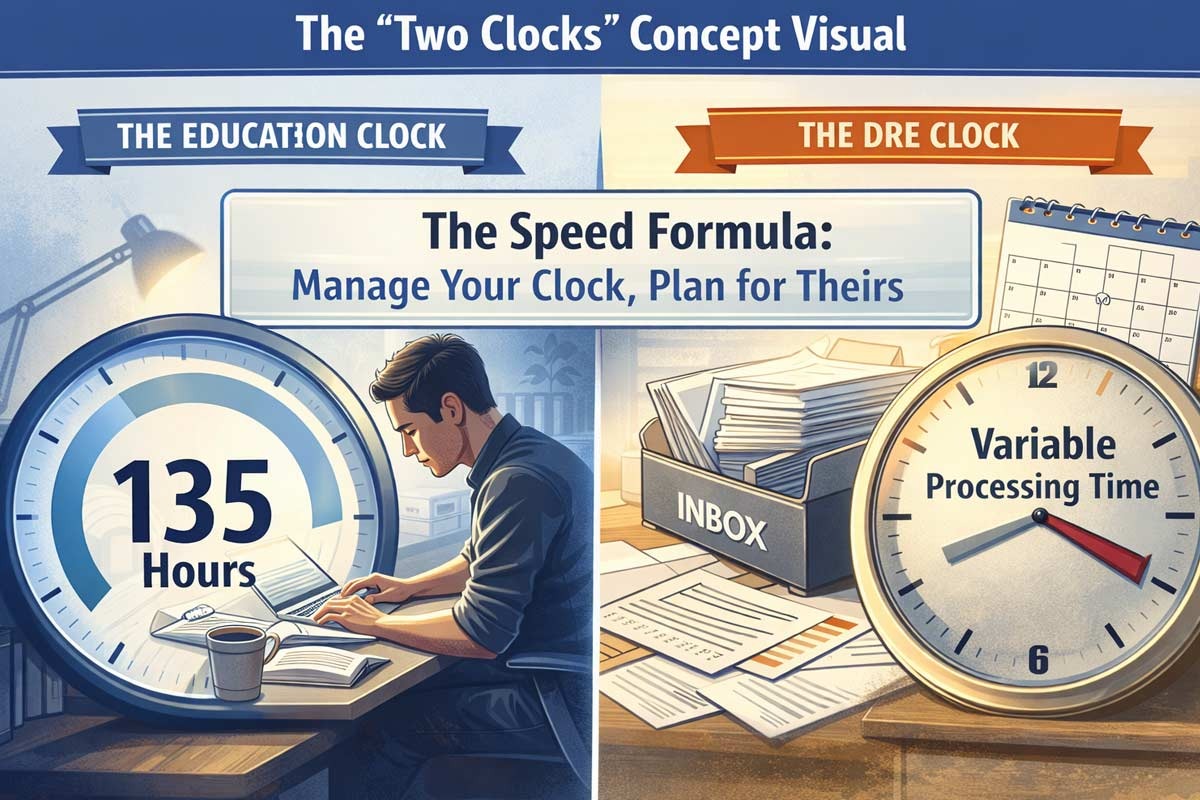
If you are eyeing a career change or a major commission goal, you probably want your license like yesterday. But in California, "fast" is governed by two different clocks that most students confuse:
Read more...
If you are eyeing a career change or a major commission goal, you probably want your license like yesterday. But in California, "fast" is governed by two different clocks that most students confuse:
The Education Clock: This covers the 135 hours of required coursework. Provider rules vary, and approved DRE-approved providers enforce a minimum access period before you can attempt a course final. The absolute "minimum" timeframe assumes you never miss a day of study and your provider’s pacing rules allow for aggressive, back-to-back completion.
The DRE Clock: This is the time it takes the Department of Real Estate (DRE) to process your exam/license application and move you forward in the system. The important detail is that processing speed isn’t fixed—it changes based on volume and the submission method. The most accurate way to set expectations is to check the DRE’s published Current Processing Timeframes and plan your education pace around that reality.
The "fastest" program isn't the one that makes empty promises; it’s the one that removes friction so you don't spend a single extra day in limbo.
TL;DR: The Speed Formula
Min. Education Time: Dependent on provider access rules - typically minimum of 54 days to complete all three courses. (18 days per course x 3 courses = 54 days)
DRE Processing: Varies by season—check DRE “Current Processing Timeframes” before you plan your target test month.
The Strategy: Finish your 135 hours while simultaneously preparing for the state exam so you pass on the first try.
What “Fastest” Actually Means in California
Speed is relative. A "fast" program helps you avoid the "Typical Path" where students stall out due to a lack of structure.
Phase
Typical Path
The Fast Path
135 Hours of Education
6–12 Months (Procrastination)
+/- 2 Months (Consistent Pace)
Application Submission
2 Weeks after finishing
Same day certificates arrive
Exam Prep
Starts after getting an exam date
Starts during the 135 hours
Passing the Exam
2–3 attempts
1 attempt (High Readiness)
The 4 Biggest Speed Levers (The Framework)
After 20 years of helping students at ADHI Schools, I’ve seen that speed isn't about how fast you read—it's about how you manage these four levers:
Format Fit: If you hate reading screens, a self-paced online course will be your slowest option because you’ll avoid it. Pick the format you will actually show up for.
Weekly Pace: Speed requires a calendar. We find that students who commit to 10 hours per week finish with the highest momentum.
Support Speed: When you’re stuck on a concept, waiting three days for an email reply kills your drive. Fast programs offer immediate clarity.
Completion Workflow: The fastest schools (like ADHI Schools) have automated certificate delivery and clear "Next Step" checklists. You shouldn't have to wonder how to apply for the state exam.
Speed Tip #1: The Concurrent Strategy
Don't wait until you finish your 135 hours to look at real estate exam prep. Start reviewing practice questions by your third week of study to keep the material fresh.
Fastest Education Formats (Pros/Cons)
There is no "best" format, only the one that keeps you moving.
Self-Paced Online
Best for: Highly disciplined individuals with erratic schedules.
Pros: Access 24/7; move as fast as the provider’s minimum access rules allow.
Cons: High "stall-out" rate. Without a teacher, many students stop mid-way.
Compare options in our guide to the Best Online Real Estate Schools in California (2026 Rankings).
Live Online (Livestream)
Best for: Career changers who need a "place" to be.
Pros: Scheduled classes prevent procrastination; real-time Q&A removes hurdles instantly.
Cons: You must adhere to the school's lecture calendar.
Check out the Best In-Person Real Estate Schools in California to see how structured environments compare to livestream.
The Hidden Bottlenecks That Slow People Down
Most students lose weeks to avoidable errors. I call these "Speed-Killers."
The Paperwork Trap: Sending an incomplete application to the DRE can result in a 60 day delay.
The Procrastination Gap: Taking a "break" between finishing Course 1 and starting Course 2.
The Overconfident Crammer: Trying to learn everything the night before the state exam, failing, and having to wait weeks for a re-take.
Speed-Killer Checklist:
Did you include your Live Scan (fingerprints) with your application?
Is your check/credit card info for the DRE accurate?
Have you scheduled 2 hours of study for tomorrow?
Speed Tip #3: Treat Live Scan like a first-week task
Many delays happen when students finish their education, then start gathering documents. If you’re trying to move fast, handle Live Scan and your application checklist early so you’re ready to submit immediately when certificates are issued.
How to Build a 30–60 Day “Fast Track” Plan
To finish the education portion efficiently, follow one of these blueprints:
Plan 1: The Aggressive Track (Full-Time Focus)
Monday–Friday: 3 hours of reading/quizzes (Morning block).
Saturday: 2 hours of review.
Goal: Complete each course the moment your provider’s access period allows.
Plan 2: The Busy Professional (Nights & Weekends)
Tuesday/Thursday: 2 hours (Evening).
Saturday/Sunday: 4 hours each day.
Goal: Finish the 135 hours in 8 weeks without burning out.
What to Look For in a “Fast” California Real Estate School
When evaluating schools, use this rubric to ensure they won't hold you back:
Transparent Access Rules: Do they explain their minimum course duration clearly?
Exam Prep Integration: Is the "how to pass" part of the "how to finish" process?
Mobile-Friendly: Can you knock out 15 minutes of reading while waiting for a coffee?
Alumni Volume: Large schools often have more streamlined systems. (See the Most Popular Real Estate Schools in California).
Price vs. Value: The Cheapest Real Estate Schools in California might save you $50 but cost you months in slow support or outdated materials.
FAQ
What is the fastest possible time to get licensed in California?
Realistically, the “fast track” is a few months, assuming you (1) keep a consistent weekly pace through the 135 hours, (2) submit your application immediately when your certificates are issued, and (3) prepare during the coursework so you pass on the first attempt. Because DRE volume changes, the most accurate planning tool is the DRE’s Current Processing Timeframes page.
Can I do all 135 hours in a weekend?
No. Pre-licensing is not the same as continuing education. A compliant pre-license program must document and administer the course in a way that matches the approved instructional time and delivery rules for licensing credit. If a provider implies you can complete the full 135-hour requirement in a weekend, the risk is simple: the credit may not hold up when you apply.
Does in-person make it faster?
Only if you are someone who won't study at home. Accountability is a massive speed booster.
Is self-paced always the fastest?
On paper, yes. In practice, no. Without a schedule, many students take a year to finish what should take two to three months.
What delays the DRE process?
Errors on the application, missing fingerprint receipts, or peak seasons when thousands of people apply at once.
Your Next Step
Speed is a byproduct of a good system. Choosing a program that aligns with your learning style is the single most important decision you will make. While you might be tempted by the "easiest" or "cheapest" option, the fastest way to start earning commissions is to choose a school that provides a clear, friction-free path to the state exam.
Ready to find the right fit?
Check out our comprehensive breakdown of the Best Real Estate Schools in California to compare programs and start your journey today.
TLDR: To get your California real estate license as fast as realistically possible, you must complete 135 hours of DRE-required pre-licensing education (Principles, Practice, and an elective) and then clear the DRE’s application + exam scheduling timeline. Course pacing depends on the provider’s access rules and your weekly schedule, while the DRE timeline fluctuates throughout the year—so the true “fast track” is finishing your education on a strict plan while preparing for the state exam at the same time, so you pass on the first attempt.
|
Key Takeaways
Common Live Scan Timing: DOJ often completes initial processing within 3–7 business days, though file matching at the DRE may add time.
The reader should treat all timelines as Read more...
Key Takeaways
Common Live Scan Timing: DOJ often completes initial processing within 3–7 business days, though file matching at the DRE may add time.
The reader should treat all timelines as highly variable: Estimates and always consult the DRE and DOJ websites for the most current official information.
Out-of-State Hard Cards: This process relies on mail and manual handling; plan for a timeline that can extend several weeks or longer.
Critical Dependency: The DRE cannot issue your license until they receive your fingerprint results and complete required review steps.
Common Delay Cause: Mismatched names (e.g., “Ben” vs. “Benjamin”) or using the wrong ORI code (A0075). The ORI code is input at the Livescan provider and must be input exactly as A0075 to ensure that the prints and background are transmitted to the DRE.
Waiting for your background check to clear can feel like the longest part of getting your real estate license. You’ve passed the real estate school exams, submitted your application, and now you’re stuck in limbo, wondering if something minor in your past is holding everything up.
Fingerprinting is a standard dependency step. While it can be nerve-wracking, delays are usually bureaucratic rather than catastrophic. For most applicants using Live Scan within California, the process is automated and relatively quick. For out-of-state applicants using physical fingerprint cards, a little more patience is required.
In my 20+ years of helping students navigate the California Department of Real Estate (DRE) system, we have found that most “stalled” applications aren’t actually stuck—they are simply moving through the standard queues. This guide breaks down exactly how long the process usually takes, why it might slow down, and how to keep it moving.
Disclaimer: This article is for informational purposes only and does not constitute legal advice. Processing times are estimates based on typical DRE and DOJ workflows. For individual eligibility questions, consult an attorney.
The 30-Second Answer: When Will My Fingerprints Be Processed?
If you are looking for a timeline to plan your career launch, here are the common benchmarks we see.
In-State (Live Scan): Often 3 to 7 business days.
Best case (sometimes): ~48 hours.
Standard: 1 week.
Buffer: It is wise to plan for 2 weeks to account for volume spikes or matching delays.
Out-of-State (Hard Cards): Can take several weeks to months.
Why: These often involve more manual handling and mailing time before they even reach the DRE.
The "Smart Applicant" Buffer: Do not schedule your “I’m a Realtor party!” until you have your license number in hand. Even after the DRE receives your results, they still need to process the file and complete issuance.
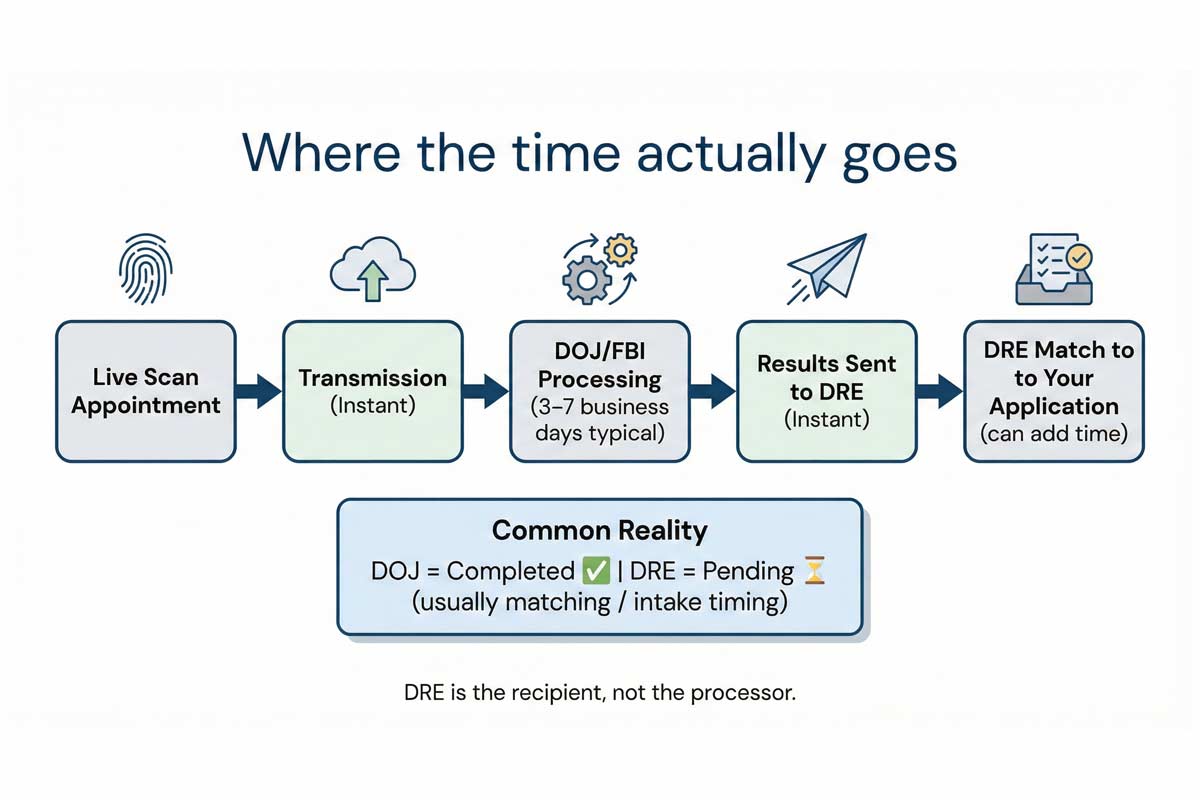
What "Fingerprinting" Actually Is
Many applicants think the DRE is scanning their prints personally. They don’t.
When you get fingerprinted, you are submitting your biometric data to the California Department of Justice (DOJ) (and, when applicable, FBI checks).
This is a "Live Scan." Your prints are digitized and cross-referenced against criminal records (arrests and convictions). The DOJ and FBI then generate a report—either "no record match" or a list of "Hits" (records found)—and transmit that report electronically to the DRE.
Important: The DRE is the recipient, not the processor. They are waiting on the DOJ just like you are.
Step-by-Step Timeline: From Scan to License
Understanding the invisible relay race helps you spot where things might be stuck.
Scheduling & Submission: You download Form RE 237(Live Scan Service Request) and visit a certified Live Scan provider (often a shipping center, notary, or law enforcement office). You pay the processing fee plus the operator’s rolling fee.
Transmission (Instant): The operator hits “send.” Your encrypted prints go directly to the DOJ and FBI.
Processing (Variable): The DOJ and FBI automated systems run the check (often within a few days, sometimes longer if a manual review is triggered).
Results Transmission (Instant): The system automatically sends the result code to the agency linked to the ORI code you used (specifically, the DRE).
DRE Match & Update (Variable): This is where delays often happen. Even if the DOJ status shows "Completed," the DRE’s system must receive that digital result and match it to your open license application.
Note on Delays: If DOJ shows "Completed" but DRE still says pending: it’s usually a matching or intake timing issue—not a denial.
The Biggest Reasons It Takes Longer (And How to Fix Them)
If it has been more than two weeks and you haven’t heard anything, one of these culprits is likely to blame.
1. The "Name Mismatch" Trap
Symptom: You passed your test and did Live Scan weeks ago, but the DRE still says "Pending."
Likely Cause: You applied for your license as "Michael Smith" but your driver's license (and thus your Live Scan) says "Mike Smith." The DRE’s computer system cannot automatically link the two files.
Fix: Ensure your name on Form RE 237 matches your DRE application character for character. If you suspect a mismatch, you may need to call the DRE to manually merge the files.
2. Wrong ORI Code
Symptom: Your results were sent to the wrong agency (like the Board of Nursing or a school district).
Likely Cause: The operator typed in a generic code or you used an old form.
Fix: Always use the pre-printed Form RE 237. The ORI Code for the CA DRE is A0075. If this was entered incorrectly, you may need to redo the Live Scan entirely to ensure the DRE receives the data.
3. Application Intake Volume
Symptom: DOJ completed days ago, but DRE status hasn't budged.
Likely Cause: Your application itself is still in the intake queue, or there is a backlog in manually associating results during peak seasons.
Fix: Call the DRE to confirm they have received the transmission and ask if your application is simply in the intake queue.
4. Poor Fingerprint Quality
Symptom: You receive a rejection notice or a request for a resubmission.
Likely Cause: Faint ridges due to manual labor, frequent hand-washing, or dry skin. The DOJ system couldn't read the prints.
Fix: Use a high-quality lotion for a few days before your rescan.
5. Manual Review (The "Hit" Delay)
Symptom: DOJ processing time drags on for 30+ days.
Likely Cause: A "Hit" (criminal record) or a name common enough to trigger a manual check against someone else's record. If you're worried about what a "hit" could mean for your license eligibility, this is a good read What the DRE Looks for in Your Background Check.
Fix: Patience is required here. The DOJ must manually verify that the record belongs to you (or clear you if it's a false match).
Live Scan vs. Out-of-State: Two Different Worlds
Track 1: Live Scan (California Residents)
This is the standard path. It is digital, efficient, and trackable. You walk into a participating Live Scan provider, put your hands on the glass, and you are done in 10 minutes. You get an ATI Number (Applicant Transaction Identifier) at the bottom of your form. Keep this number—it is your tracking ticket.
Track 2: Hard Cards (Out-of-State)
Live Scan is primarily available in California. Most out-of-state applicants must use physical fingerprint cards (FD-258) unless they travel to CA.
The Delay: The DRE has to physically receive the cards, process the payment, and then forward the cards to the DOJ. The DOJ then has to manually scan them. Hard-card timelines vary based on mail time, card quality, and backlog.
The Risk: Ink smudges easily. If your hard cards are rejected for quality after waiting several weeks, you often have to start over.
Pro Tip: If timing is critical, some applicants choose to travel to California to complete a Live Scan in person and reduce potential delays.
Delay-Proof Checklist
To minimize friction, treat the paperwork as seriously as the exam:
Download the correct form: Use the current RE 237 from the DRE website.
Verify the ORI: Check that Box 1 says A0075 and says "CA Department of Real Estate."
Match your ID: Ensure the name on the form matches your Driver's License and your exam application.
the receipt: Do not leave the operator without the ATI Number written on your copy.
Submit early: Do not wait until you pass the exam. You can (and should) submit fingerprints as soon as you apply for the exam to get the clock ticking.
If It’s Taking Too Long: Escalation Ladder
What to do today:
Check your ATI number.
Verify your name spelling on your receipt.
Check the online DOJ status tool.
If it has been longer than typical timeframes, follow this ladder:
Check the DOJ Status: Go to the California DOJ Background Check Status website. Enter your ATI Number and Date of Birth.
Note: This tool reflects DOJ processing status; it doesn’t guarantee the DRE has matched it to your application yet.
Status "In Process": The delay is at the DOJ/FBI level. The DRE cannot help you yet.
Status "Completed": The results were sent to the DRE. Now the ball is in their court.
Verify Your Info: Double-check your copy of the form. Did the operator transpose digits in your identifying information?
Contact the DRE: If the DOJ says "Completed" but the DRE status hasn't updated in 10 business days, call the DRE Licensing line. Have your ATI number ready and ask if there is a "matching issue" with your file.
Important Distinction: Processing vs. Evaluation
It is vital to understand that "processing" and "evaluation" are two different steps.
Processing is simply the DOJ confirming your identity and sending a list of records (if any) to the DRE.
Evaluation is the DRE reviewing those records to decide if you meet the standards of honesty and truthfulness required to hold a license. If you have a past conviction, the "processing" might finish quickly, but the "evaluation" could take weeks while a DRE review team examines your case.
Your Next Step
Fingerprinting is a hurdle, not a wall. While you wait for the results, focus on what you can control: preparing for your exam and interviewing brokerages.
Most delays are solvable, and the vast majority of applicants see their results clear without issue. If you are just starting your journey and want to ensure every step—from coursework to application—is handled correctly, check out our comprehensive California Real Estate License Guide.
|
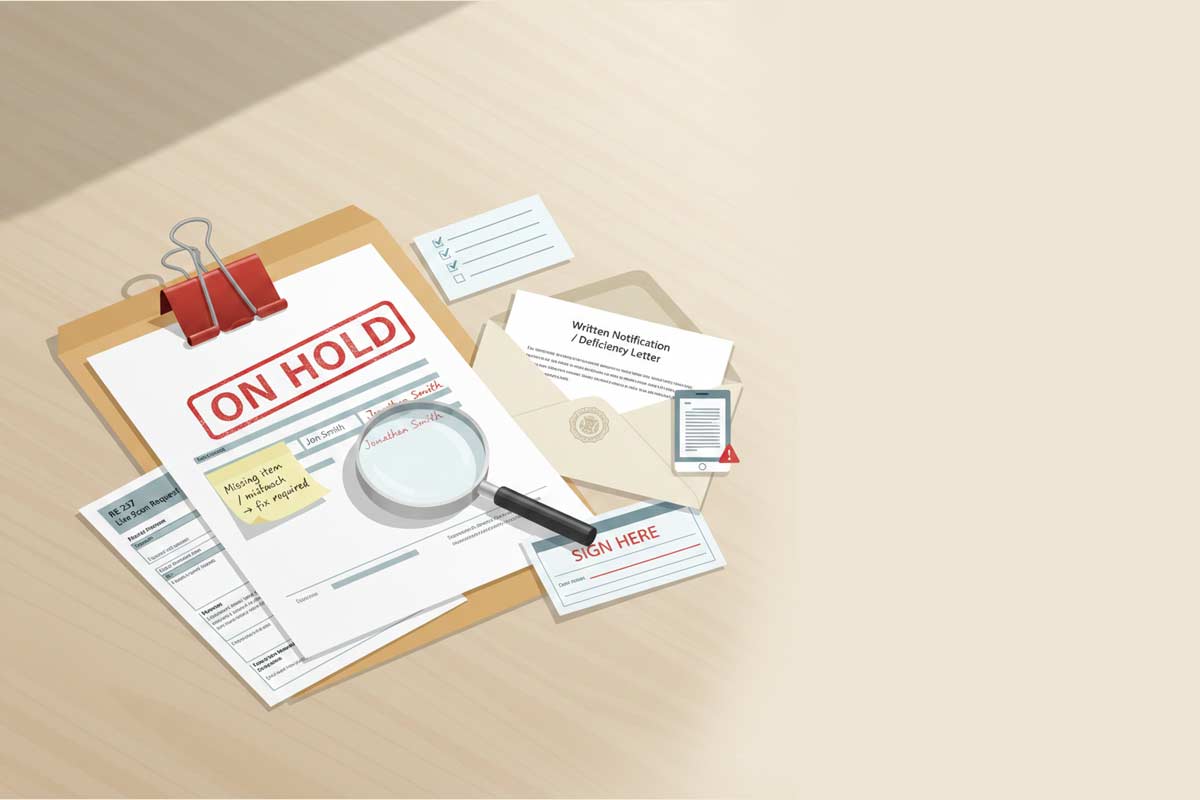
When the California Department of Real Estate finds a missing item, data mismatch, or unanswered question, your real estate exam or license application doesn’t “fail” — it simply stops moving forward Read more...
When the California Department of Real Estate finds a missing item, data mismatch, or unanswered question, your real estate exam or license application doesn’t “fail” — it simply stops moving forward until you provide what is requested. The DRE will send a deficiency letter if your application is incomplete or lacks required items when submitted.
You typically won’t be scheduled for your real estate exam until all requirements are met.
When it comes to applying for the real estate exam, you are not being graded on effort; you are being graded on completeness. Tiny issues — a name mismatch, unreadable certificates of completion, or incorrect fees — can turn into weeks of avoidable lag. The goal of this guide is to help you submit an application that avoids back‑and‑forth and keeps you on the most direct path to the real estate exam.
The Big 5: Highest‑Frequency DRE Form Mistakes
Mistake 1: Name Inconsistency Across Documents
The Error: Using a nickname or shortened name on the application while your transcripts or ID show a different variation.
Why DRE Flags It: DRE instructions (RE 435A/RE 400A) indicate you must use your legal name. If your application says “Jon Smith” but your transcripts and ID say “Jonathan Smith,” the DRE may ask for clarification to verify your identity.
The Fix: Use one consistent name across all three pillars: your application (RE 400A or RE 435), your certificates of completion, and your ID. If your transcripts include a middle name, include that middle name on all forms.
Verification Step: Lay your ID and transcripts next to your application. If there is a discrepancy in spelling or suffixes (Jr., III), edit the application to match your supporting documents before submitting.
Mistake 2: Combined Application Sequencing (Live Scan)
The Error: Choosing the Combined Exam + License path but failing to include the Live Scan paperwork.
Why DRE Flags It: DRE guidance for combined applications (RE 435) states that deficiencies — including a missing Live Scan Service Request (RE 237) — will delay processing. While fingerprints can be done later, a license cannot be issued until results are received.
The Fix: For the smoothest processing, include the completed RE 237 in your initial submission packet.
Verification Step: If submitting the RE 435 (Combined), ensure the RE 237 is the very next document in your physical or digital stack.
Mistake 3: Unacceptable Education Evidence
The Error: Submitting unofficial transcripts, portal screenshots, or blurry photos.
Why DRE Flags It: DRE requires official transcripts (or copies of official transcripts) or a credit certificate as evidence of completion. RE 435A explicitly states that unofficial transcripts are not accepted. Documents that are illegible or incomplete cannot be verified.
The Fix: Submit clear, high‑resolution scans of your official transcripts or credit certificates. Ensure the school name, student name, and completion dates are clearly visible.
Verification Step: Open your scanned PDF and zoom to 100%. If you cannot easily read the course titles or dates, rescan the document.
Mistake 4: Vague Background Explanations
The Error: Checking “Yes” to a disciplinary or criminal question but providing a brief or vague statement.
Why DRE Flags It: DRE instructions state that “insufficient or no explanations” to background questions will delay processing. Failure to disclose accurately can result in substantial delays or the denial of your application.
The Fix: For every “Yes” answer, provide a detailed written explanation. Include the specific charge, the date, the location, and the final disposition. Include court documents; providing certified copies can help avoid follow‑up requests.
Verification Step: Read your explanation. If it doesn’t clearly provide the context of the incident and the final outcome, it is likely to result in a deficiency letter.
Mistake 5: Fee Discrepancies
The Error: Submitting the wrong fee amount or an unsigned payment form.
Why DRE Flags It: Fees are non‑refundable and subject to change. An application cannot be processed until the correct fee is received.
The Fix: Verify the current fee schedule on the DRE website immediately before mailing. Ensure the Credit Card Payment (RE 909) or check is signed and matches the total for your selected application path.
Verification Step: Double‑check the total for “Exam Only” (RE 400A) vs. the combined application fee (RE 435). Ensure your payment matches the specific path you selected.
The “Death by Details” Mistakes (Rapid‑Fire List)
Original Signatures (Mail): If mailing the RE 400A or RE 435, use original wet signatures; faxes and photocopies of signatures are not accepted for mailed forms. (ADHI Schools recommends eLicensing not a physical mailed application.)
Form Choice: Verify you are using RE 400A for salesperson exam‑only or RE 435 for the combined path.
Unanswered Bubbles: Unanswered Bubbles: Every "Yes/No" bubble is mandatory. Skipping one can result in written notification of deficiency.
Outdated Revisions: Check the “Rev” date at the bottom of your form to ensure it matches the most recent version on the DRE website.
Non‑Resident Requirements: If you are not a California resident, you may be required to include a Consent to Service of Process (RE 234).
Cropped Scans: If page numbers or form borders are cut off in your PDF, it may be rejected as incomplete.
Missing Prerequisites: Do not submit until you have completed all three required courses (Principles, Practice, and an Elective).
Incomplete RE 909: If submitting by mail, a missing signature on the credit card authorization form is a common cause for administrative lag.
Submission Quality Control: 7‑Minute Pre‑Flight Checklist
Name Consistency: Is my name identical across my transcripts, ID, and application?
Path Selection: Did I use RE 400A for exam‑only or RE 435 for combined?
Evidence: Are my transcripts or certificates official and 100% legible?
Fingerprints: For combined applicants, is the RE 237 included in the packet?
Background: Is every "Yes" answer supported by a detailed statement and court docs?
Payment: Is the fee submitted online correct and the check or RE 909 signed in ink? (if submitting by mail)
Method: Have I reviewed the How to apply for the real estate exam guide to ensure my submission is organized correctly?
If You Receive a Deficiency Letter
If the DRE sends written notification, it means they need additional information before they can move you forward. To resolve this:
Follow Instructions Exactly: The letter will specify exactly what is missing. Provide only what is requested.
Submit a Unified Response: If multiple items are requested, send them all in one package to avoid further confusion.
Expect Additional Time: Once you respond, your file must be re‑reviewed. Check the DRE’s current processing timeframes online for an estimate of the updated wait.
Maintain Consistency: Ensure any new documents or signatures match the information provided in your original submission.
Get Back on the Fast Path
At ADHI Schools, Kartik Subramaniam’s 20+ years of helping California candidates has shown that success begins with the paperwork. The DRE is a high‑volume agency; they prioritize files that are complete, consistent, and easy to verify. Treat your application with the same level of focus as your studies.
For a full breakdown of every requirement you need to satisfy before the DRE ever sees your name, read our California Real Estate License Guide.
|
For many applicants, the most stressful part of getting a license isn’t the real estate license courses or the real estate exam—it’s the California real estate license background check.
The Department Read more...
For many applicants, the most stressful part of getting a license isn’t the real estate license courses or the real estate exam—it’s the California real estate license background check.
The Department of Real Estate (DRE) runs a fingerprint-based check on applicants as part of the licensing process. While many people with past infractions navigate this step successfully, others face delays or denials—often not because of the crime itself, but because of how they handled the application.
Disclaimer: I am a real estate educator, not an attorney. This article is for informational purposes only. If you have a complex criminal history, consider consulting a lawyer specializing in administrative law.
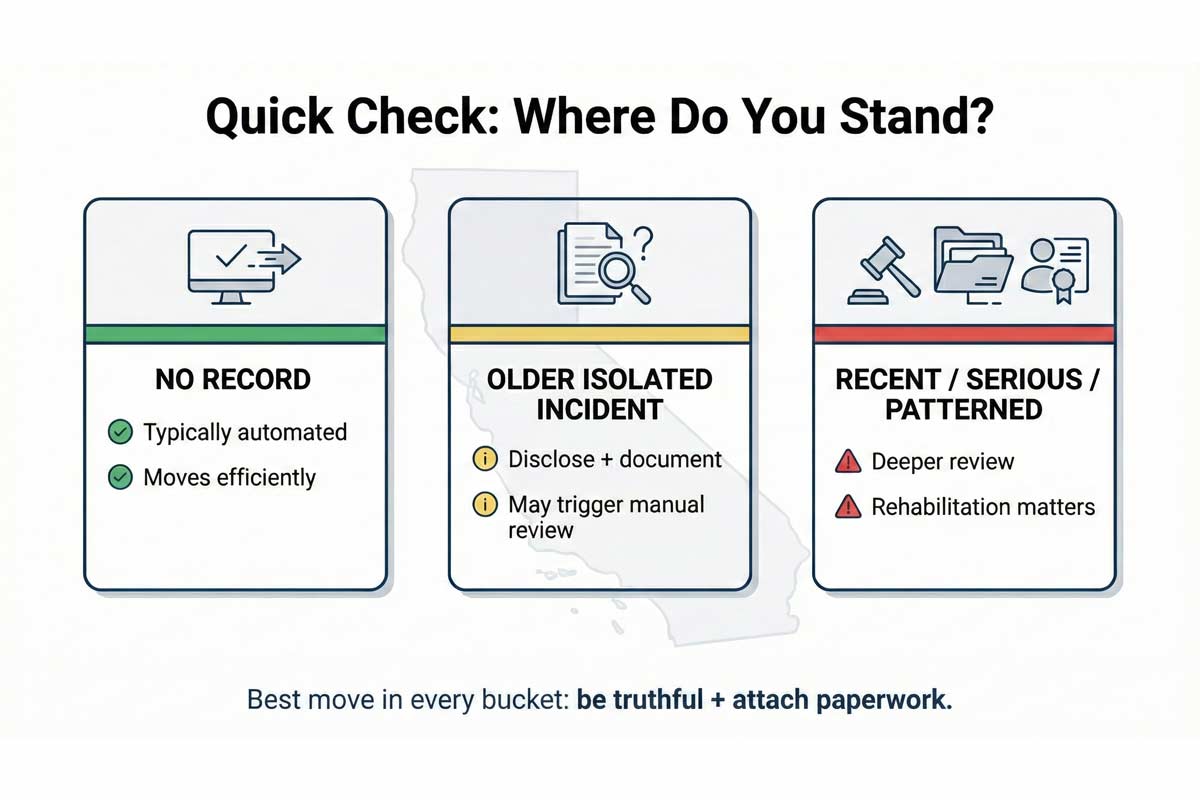
Quick Check: Where Do You Stand?
Before diving into the details, identify which "bucket" you likely fall into. This helps set your expectations.
No Record: If you have no criminal history, the process is typically automated and moves efficiently.
Older Isolated Incident: An incident from years ago often requires disclosure and may trigger a manual review, but outcomes depend heavily on the specific facts and documentation provided.
Recent, Serious, or Patterned Record: Felonies, crimes involving money/theft, or a pattern of repeat offenses will generally trigger a deeper review. Approval is not guaranteed and requires strong evidence of rehabilitation.
What "Background Check" Actually Means
The DRE uses a "Live Scan" service request. This digital fingerprinting process checks your prints against California Department of Justice (DOJ) and FBI databases.
It can surface criminal history information; what appears depends on record reporting and the specific questions being asked. The Live Scan system simply reports data—it does not make the decision. The DRE's Licensing Section reviews the results to determine if you meet the requirements for licensure.
If you are trying to time your application, understanding the logistics matters. You can learn more about the timeline here: How Long Does the CA Real Estate Fingerprinting Process Take?
The Core Metric: "Substantial Relationship"
The DRE evaluates whether a crime or act has a "Substantial Relationship" to the duties of a real estate licensee.
Because agents handle client funds, enter private homes, and negotiate binding contracts, conduct in these areas tends to draw more scrutiny because it relates to trust, money, and consumer protection:
Dishonesty: Theft, fraud, embezzlement, forgery, or tax evasion.
Money Handling: Financial mismanagement or passing bad checks.
Safety & Trust: Conduct suggesting consumer risk, impaired judgment, or danger to others.
Beyond the Charge: Your "Risk Profile"
The DRE considers contextual factors to build a risk profile:
Recency: The more time since the incident, the more it may be mitigated—especially with a clean record since.
Pattern:Repeated behavior suggests a habit rather than an isolated mistake.
Harm: Acts that caused financial loss or physical harm typically draw higher scrutiny.
Compliance: Outstanding court obligations (probation, fines, restitution) are major red flags.
Rehabilitation: Evidence of positive change, such as education or steady employment, is critical.
The #1 Application Killer: Non-Disclosure
The fastest way to complicate your application is to hide your history. If the form asks a question, answer that question—don’t answer the version you wish it asked.
If you check "NO" on a criminal history question when the correct answer is "YES," the DRE may view it as a new act of dishonesty. This can be grounds for denial even if the original offense was minor.
Crucial Warning: Consistency Matters
Your written explanation must match the official court paperwork. If you say an incident happened in 2015 but the court docket says 2017, or you list a different charge than what is on the record, it triggers follow-up questions. Double-check your dates and charges against the actual documents before writing your statement.
Operational Checklist: What to Do BEFORE You Apply
Don’t wait until you are filling out the form to start digging.
Request Court Dispositions: Contact the court clerk for certified copies of the final disposition for any incident.
Gather Proof of Compliance: Get written proof (completion letter/receipt), not just verbal confirmation.
Draft Your Statement: Use the facts from your court documents to write a concise explanation.
Review the Application Line-by-Line: Read the disclosure questions on the DRE form carefully to ensure you truthfully answer exactly what is asked.
Micro-Template: Personal Statement
Keep your explanation factual, accountable, and brief. Attach this to your application if required.
Incident: Date / Charge / Disposition / Completion status
Accountability: One clear sentence taking responsibility for the actions.
Rehabilitation: List steady employment and/or education since the incident.
Current Standard: One sentence affirming commitment to professional ethics.
Note: Attach your court paperwork to back this up. Don’t rely on memory.
What Happens If You Are Flagged?
If the background check triggers a review, the process typically follows these steps:
Manual Review: An analyst examines your history and documents.
Inquiry: The DRE may request additional information or clarification. Respond immediately to avoid delays.
Decision: Clearance OR a formal denial notice/Statement of Issues with options described in writing.
How to Position Your Application
Your goal is to show stability and honesty.
DO THIS
DO NOT DO THIS
Be direct. State the charge and date clearly.
Be vague. "I had a run-in with the law."
Show stability. Provide proof of steady work history.
Overshare. Avoid emotional stories or excuses.
Take ownership. "I made a poor decision."
Blame others. "The system was unfair."
Provide paperwork. Certified court docs are essential.
Make them hunt. Don't force DRE to search for your files.
Real-World Scenario:
I recall a student with a theft conviction from her early 20s who disclosed it fully, attached court records, and provided a character letter from her employer. Submitting documentation upfront can reduce follow-up requests compared to leaving the reviewer guessing.
Frequently Asked Questions
Will a misdemeanor stop me from getting licensed?
Not necessarily. The DRE looks at the nature of the crime (Does it relate to real estate duties?) and how much time has passed. A misdemeanor involving dishonesty is viewed differently than one that does not.
What if it was a long time ago?
Time is often a mitigating factor. A clean record for a significant period helps demonstrate rehabilitation and reduces the "risk profile."
Do arrests matter or only convictions?
Answer exactly what the DRE application asks. If the question asks for convictions, disclose them. Pending matters (arrests awaiting trial) may delay review until resolved.
Does expungement mean I don't have to disclose?
Some licensing processes still require disclosure even after dismissal/expungement—follow the instructions on the specific DRE form.
What if I forgot to list something?
If you realize you made an error after submitting, contact the DRE immediately to amend your application. Self-correcting is always better than letting them discover the omission on their own.
The Bottom Line
A background check is a standard part of protecting the public. If you own your past, provide the right documentation, and focus on your current qualifications, you improve your odds of a smooth process
Ready to map out the rest of your journey? Check out our complete Check out our complete California Real Estate License Guide.
|
It starts with a burst of energy. You decide to take control of your career, enter a new industry, and prepare to get your first clients.
But then, life happens. The 135-hour requirement feels like Read more...
It starts with a burst of energy. You decide to take control of your career, enter a new industry, and prepare to get your first clients.
But then, life happens. The 135-hour requirement feels like a mountain. The DRE website looks like a maze of 1990s-era forms. Suddenly, six months have passed, and you haven’t even scheduled your exam.
This is the "Licensing Spiral": a cycle where administrative confusion and life interruptions kill your momentum until your goals disappear entirely.
In my 20+ years of coaching thousands of candidates at ADHI Schools, I’ve realized that failing to get licensed is rarely about a lack of intelligence. It is almost always a result of predictable, procedural friction points. If you fix the one friction point you’re stuck on, the rest becomes straightforward.
Key Takeaways
Process > Intelligence: Administrative errors kill more careers than the actual exam does.
Timelines Matter: Processing times and scheduling delays can quietly derail you.
Momentum is King: If you aren't moving forward, you are moving backward. Use the rescue checklist below to restart.
The 60-Second Licensing Map
To get your license, you must follow this exact sequence. If you are currently stalled, you are stuck at exactly one of these five steps:
Complete 135 Hours: Finish three approved college-level courses.
Apply & Schedule: Submit your Combined Exam/License Application to the DRE.
Pass the State Exam: Score 70% or better on the 150-question test.
Submit License Application: Ensure background checks and fees are finalized.
Affiliate with a Broker: Find a sponsoring broker to "activate" your license.
For a complete, step-by-step blueprint of the licensing journey, see the California Real Estate License Guide.
10 Reasons People Fail (And How to Fix Each)
1. The "Casual Study" Fallacy
The Mistake: Picking up the material only when you "have time."
The Consequence: You lose continuity and momentum, making it harder to retain complex legal concepts as you move through the modules.
Fix Today: Open your calendar and block out exactly 90 minutes for tomorrow morning. Consistency beats intensity every time.
2. Misunderstanding the Application Window
The Mistake: Waiting until you have "mastered" every page of the material before looking at the DRE application.
The Consequence: DRE processing can take weeks. Waiting to “feel like you’re ready” before applying adds a massive "dead zone" where your knowledge goes cold.
Fix Today: Understand the nuances of the timeline by reading Can You Take the Exam Before Completing All 135 Hours? to see when you should actually apply.
3. The "Name Mismatch" Error
The Mistake: Using a nickname or maiden name on your Live Scan (fingerprints) that doesn’t match your official DRE application.
The Consequence: This creates a manual "flag" in the DRE system, potentially delaying your eligibility by 30–60 days while they reconcile your files.
Fix Today: Look at your government-issued ID. Ensure every form you sign matches that ID character-for-character.
4. The Memorization Trap
The Mistake: Taking the same practice quiz 50 times until you "know the answers."
The Consequence: You aren’t learning the law; you’re learning the pattern of a quiz. When the DRE rephrases the question on exam day, you will fail.
Fix Today: Do mixed sets of questions and track wrong answers by topic. If you can’t explain the logic of the correct answer out loud, you don’t know it yet.
5. The "Post-Pass" Momentum Kill
The Mistake: Celebrating the passing score but failing to file the final paperwork or pay the licensing fees.
The Consequence: Your passing score has an expiration date. If you don't file the application for your license promptly, you will have to retake the entire state exam.
Fix Today: Decide whether you are going inactive vs. active, and complete the post-pass steps immediately. Follow our guide on What Happens After You Get Your California Real Estate License? to ensure you cross the finish line.
6. Paralysis by Analysis (The Research Trap)
The Mistake: Spending weeks in online forums asking "Which school is best?" instead of starting.
The Consequence: Research is often just a sophisticated form of procrastination used to mask the fear of starting a new career.
Fix Today: Start with ADHI Schools—ideally today—and finish Lesson 1 of your first course. Clarity comes from action.
7. Distraction by Brokerage Interviews
The Mistake: Interviewing 10 different brokerages before you even have an exam date.
The Consequence: You are focusing on Step 5 when you are still at Step 1. This drains the mental energy you need for the state exam.
Fix Today: Realize you don't need a broker to get the process started. Get the facts here: Do You Need to Join a Brokerage Before Applying for a License?
8. Underestimating Logistics & Fees
The Mistake: Failing to budget for the multi-step fee structure.
The Consequence: You pass the exam but "wait for the next paycheck" to pay the licensing fee, which turns into a multi-month delay.
Fix Today: Set aside the DRE exam/license fees plus Live Scan vendor fees now so money never becomes a stall point.
9. Trusting Forum Myths Over DRE Facts
The Mistake: Following advice from "someone on Reddit" regarding current DRE regulations.
The Consequence: Regulations change. Relying on outdated anecdotes can lead to rejected applications or missed deadlines.
Fix Today: Only trust official DRE publications or ADHI Schools that handles these filings daily.
The 10-Minute Rescue Checklist
If you are here...
Your next 60 minutes...
The Momentum Builder...
Haven't started courses
Enroll in ADHI Schools.
Complete Chapter 1 immediately.
Stuck mid-course
Audit your calendar; identify the "leak."
Block 90 mins for tomorrow; no excuses.
Finished courses, no exam date
Submit your application (eLicensing preferred).
Verify your ID name matches exactly.
Waiting for DRE processing
Establish a "Study Retention" schedule.
Keep studying 20–30 min/day to prevent decay.
Passed, but no license yet
Check your status on eLicensing.
If not a combo app, submit the license app quickly.
FAQ: Common Licensing Questions
Can I take the California real estate exam before finishing my 135 hours?
You must complete the three required courses to be eligible for an exam date. However, you can often save time by understanding exactly when to submit your application and what documentation to send so you don’t create a "dead zone" while the DRE processes your file. See our 135-hour timing guide for the specific strategy.
Do I have to use eLicensing for my application?
No, but the DRE states that eLicensing is significantly faster for processing. If you choose to use paper (Form RE 435), it must be mailed with original signatures.
What’s the most common reason people fail the California real estate exam?
Over-thinking. Candidates often try to apply "real world" logic or stories they heard from friends rather than relying on the specific legal definitions found in the textbook.
The Path Forward: Stop Stalling
Stalling is a normal part of the process, but it doesn't have to be the end of your story. The difference between a "former student" and a "top producer" is simply the willingness to fix these procedural errors and keep moving.
For the step-by-step map: Start with the California Real Estate License Guide.
For the "After-Pass" plan: Read What Happens After You Get Your California Real Estate License?
For a proven system: If you want the courses, the structure, and the veteran coaching to avoid these mistakes entirely, ADHI Schools is built for exactly that.
Let’s get to work.
|
Failing the California real estate exam can feel confusing and discouraging—especially if you studied hard and thought you were prepared. After teaching thousands of students at ADHI Schools, I can tell Read more...
Failing the California real estate exam can feel confusing and discouraging—especially if you studied hard and thought you were prepared. After teaching thousands of students at ADHI Schools, I can tell you this: good people fail this exam for predictable, fixable reasons.
Most students who fail aren’t lacking intelligence. They’re dealing with:
Studying the wrong material
Misreading the way the DRE writes questions
Mismanaging time and anxiety
Not truly understanding the concepts
This 2026 update breaks down why people fail—and how to avoid doing it again. If you need the full roadmap, revisit our California Real Estate Exam Guide for big-picture context.
1. Studying the Wrong Material
This is the most common failure point for people that don’t pass the real estate exam on the first attempt.
Most students think they know what’s important, but the DRE’s actual blueprint tells a different story. People over-study math, obscure facts, or random topics—and under-study the heavy hitters like Practice of Real Estate and Mandated Disclosures, Agency, and Contracts.
If the exam felt “nothing like what I studied,” it’s usually a blueprint mismatch not because the California real estate exam is inherently hard.
Fix: Study according to weighting, not feeling. Your score follows the blueprint—your study plan should too.
2. Memorizing Instead of Understanding Concepts
The DRE exam is not a vocabulary quiz. It’s a psychometric, scenario-based exam.
Even when two answers look right, only one reflects the best professional judgment.
Examples:
Knowing the definition of “fiduciary” isn’t enough—you must know how it applies in real situations.
Memorizing loan definitions won’t help if you can’t apply financing concepts to a buyer scenario.
Students who memorize instead of understanding get crushed by paragraph-style questions.
Fix:
Study concepts, not sentences.
Ask: “How would this play out in practice?”
Practice explaining rules out loud as if teaching a new agent.
Understanding beats memorization every time.
3. Weak Test-Taking Strategy
Even with strong knowledge, poor strategy sinks scores.
The CA exam is designed with:
Four options per question
Distractors that look reasonable
Trap words like always, never, must, only
Questions that hide the real ask behind long paragraphs
Weak strategy leads to:
Rushing
Misreading
Overthinking
Getting tricked by distractors
Fix:
Slow your brain, not your pace.
Your process should be:
Identify what the question is actually asking.
Eliminate two bad choices.
Choose the best remaining answer—not the first one that feels right.
4. Not Completing the 135 Hours Effectively
Yes, you “completed” the hours. But did you learn the material?
Common problems:
Clicking through content while multitasking
Rushing to unlock final exams
Treating quizzes as speed bumps instead of diagnostics
Finishing the course fast but retaining very little
The DRE requires structured pacing for a reason: cramming destroys comprehension.
Fix:
Go back into your course with intentionality:
Redo chapter quizzes
Slow down on mandated disclosures, agency, and practice
Take notes instead of scanning
Your 135 hours are the foundation. If the foundation is weak, the exam will expose it.
5. Mismanaging Exam-Day Timing and Anxiety
The pacing is strict:
150 questions in 180 minutes
≈ 1.2 minutes per question
Two patterns cause failure:
A. Poor timing
Spending too long on early questions → panic later → rushed guesses at the end.
B. Snowball anxiety
When tension rises, accuracy drops. Even easy questions start to feel hard.
You can know the material and still fail simply from mismanaging the clock or stress.
Fix:
If a question hits 90 seconds, mark it and move on
Answer all “easy confidence” questions first.
Use structured breathing to reset between sections.
The exam rewards calm, not perfection.
6. Overconfidence After Practice Exams
Practice tests help—but they can also mislead.
Students score 80–85% on practice questions and assume the real test will feel similar. But:
Practice questions are often easier
Some aren’t written in true DRE style
Students memorize patterns instead of concepts
Most don’t simulate full, timed testing conditions
Overconfidence destroys focus on test day.
Fix:
Treat practice scores as data, not predictions.
Switch question banks to avoid memorization.
Take at least one full-length timed exam to feel real pacing.
If you “crushed the practice tests” but failed the DRE exam, this is likely the reason.
7. Not Reviewing Weak Areas Using Data
Most people study based on what feels comfortable, not what the data shows.
Real patterns:
Students love reviewing topics they already understand
They avoid areas where they miss questions
They never measure category-level performance
But the DRE doesn’t care about your feelings—it cares whether you get the heavy-weighted categories right.
Fix:
Track your misses by category:
Agency
Practice & Disclosures
Contracts
Financing
Property Ownership
Land Use & Regulation
Then study ONLY your weakest two or three areas until they improve.
This is how repeat test-takers turn scores around fast.
8. Misunderstanding How the DRE Scores the Exam
There is so much myth around how the exam is scored.
Here’s the truth:
Raw scoring only
No curve
70% required for salesperson, 75% for broker
Different exam forms exist but are statistically balanced
Missing “easy questions” hurts exactly as much as missing hard ones
When students misunderstand scoring, they:
Over-focus on hard questions
Ignore high-weighted fundamentals
Think the curve will “save” them
If scoring confuses you, read How the CA Real Estate Exam Is Scored for a full breakdown.
Fix:
Aim for consistent accuracy—not perfection or “beating the curve.”
You can miss many questions and still pass. You just can’t miss the wrong ones.
If You’ve Already Failed Once (or More): What To Do Next
Failing once is common. Failing repeatedly happens only when students don’t change their approach.
Here’s your reset plan.
1. Shift mindset
Give yourself a day to be upset. Then move into diagnosis-mode:
“Where exactly did things break down?”
2. Rebuild using the blueprint
Anchor everything to the California Real Estate Exam Guide and the Content Breakdown.
3. Identify your three weakest categories
Use chapter quizzes, practice tests, and memory from the exam.
4. Fix your strategy
If timing or distractors tripped you up, revisit our Multiple-Choice Strategy article.
5. Re-engage the 135 hours
Slow down. Relearn. Retest.
6. Plan your retake intentionally
If you need reassurance about retake limits, see How Many Times Can You Take the CA Real Estate Exam?
You have time—and unlimited attempts within your application window.
7. Treat your next attempt like a professional dry run
Your goal isn’t to “beat the test.”
Your goal is to perform like the licensee the DRE is willing to approve.
Ready to Finally Pass?
At ADHI Schools, everything we teach—including exam prep, crash courses, and strategy coaching—is built around California-specific DRE standards, psychometrics, and student performance data.
If you’re tired of guessing, overwhelmed with conflicting advice, or don’t want another exam fee on your credit card, we can help you approach the next attempt correctly, confidently, and strategically.
You don’t have to be the person who almost became an agent.
With the right structure, the right content, and the right test strategy, you will pass this exam.
Ready when you are.
1. What is the number one reason people fail the California real estate exam?
Most students fail because they study the wrong material. The DRE blueprint emphasizes topics like Practice of Real Estate and Mandated Disclosures, Agency, and Contracts, not the random facts or formula-heavy topics many students focus on. Aligning your study plan with the actual DRE weighting dramatically improves pass rates.
2. Is the California real estate exam harder than people expect?
Yes—mainly because the exam is a psychometric, scenario-based test, not a memorization test. Students who rely on flashcards or definitions often struggle with paragraph-style questions that require judgment, application, and analysis.
3. What score do I need to pass the California real estate exam?
You must score at least:
70% on the Salesperson Exam → 105 correct out of 150 questions
75% on the Broker Exam → 113 correct out of 150 questions
The DRE uses raw scoring, not a curve. A miss is a miss—whether the question was “easy” or difficult.
4. Why do I pass practice tests but fail the real exam?
This is extremely common. Practice tests often:
Use easier or differently phrased questions
Encourage memorization instead of true understanding
Don’t simulate real timing or pressure
Lack scenario depth compared to DRE questions
Students should treat practice test scores as data, not predictions. Using an Error Log to categorize missed questions is one of the most effective ways to improve.
5. Does anxiety really cause people to fail the California real estate exam?
Absolutely. The exam is a timed endurance test, and anxiety causes students to:
Overspend time on early questions
Second-guess correct answers
Rush the last 20–30 questions
Misread wording or fall for distractors
Using a simple reset phrase like “One question at a time” or “Slow is smooth” helps regain focus.
6. Can you fail the CA real estate exam even if you know the material?
Yes. Many students understand the concepts but still fail due to:
Poor pacing
Weak test-taking strategy
Missing fundamentals instead of difficult questions
Misinterpreting what the question is really asking
Knowledge without a strategy leads to preventable mistakes.
7. How many times can I take the California real estate exam if I fail?
California allows unlimited retakes within your two-year application window. There is no penalty for failing besides paying the exam fee again. See our guide: How Many Times Can You Take the CA Real Estate Exam?
8. What should I do after failing the California real estate exam?
You should follow a structured reset plan:
Diagnose your weakest categories
Re-align with the DRE content outline
Re-engage your 135 hours with intention
Practice full-length timed exams
Strengthen test-taking strategy
Track mistakes using an Error Log
Repeat test-takers improve fastest when they take a data-driven approach, not a “study everything again” approach.
9. Is the California real estate exam curved?
No. The DRE does not curve, scale, or adjust scores. Each question carries equal weight. Different exam forms are equated psychometrically to ensure fairness, meaning the difficulty level is balanced statistically—not curved.
10. What topics should I focus on to avoid failing the exam again?
Focus on the highest-weighted categories, which often include:
Practice of Real Estate & Mandated Disclosures
Agency & Fiduciary Duties
Contracts
Property Ownership & Regulations
These areas make up a significant portion of the exam and must be mastered to pass. See our California Real Estate Exam Content Breakdown for details.
|
TL;DR: The Bottom Line
The Answer (in plain English): No — you can’t be authorized to schedule or take the California real estate exam until the Department of Real Estate Read more...
TL;DR: The Bottom Line
The Answer (in plain English): No — you can’t be authorized to schedule or take the California real estate exam until the Department of Real Estate (DRE) verifies you’ve completed all 135 hours (three 45-hour courses).
The Risk: Submitting your application while you’re “still finishing” your last course is the fastest way to trigger a DRE deficiency notice and delay.
The Solution: Finish your courses, secure your certificates, and follow the "clean-file sequence" to move from candidate to licensee without bureaucratic friction.
Most confusion comes from mixing up applying to the DRE with scheduling an exam date—scheduling your state exam can only happen after DRE approval.
The Truth Table: What You Can (and Can’t) Do Right Now
Action
Possible before 135 hours?
Outcome / Practical Advice
Submit DRE application
Yes (don’t)
Triggers a deficiency notice and adds weeks of delay.
Get Authorization to Schedule
No
The DRE won’t issue an exam invite until your file is 100% complete.
Choose an exam date
No
You can’t access the eLicensing calendar until you’re approved.
Study & exam prep
Yes
Recommended — this is the only “shortcut” that actually works.
The Speed Trap: Why "Almost Done" Is Still a "No"
In my 20-plus years of training thousands of agents at ADHI Schools, I’ve seen one mistake repeat more than any other: the Speed Trap.
It usually starts with a highly motivated candidate who is halfway through their third course. They look at the DRE’s current processing times—which fluctuate—and think they’ve found a loophole. They decide to mail their exam application today, assuming that by the time a DRE processor actually opens their envelope, they will have finished the course and can just "send in the final certificate later."
This is a high-stakes gamble that almost nobody wins. The DRE does not "hold" your spot in line while you finish your homework. If a processor opens your application and the course completion certificate is missing, the process doesn’t pause—it breaks. You won’t just lose time; you’ll lose your momentum and you'll be waiting for a deficiency notice and a new review cycle before you can fix it.
The DRE’s system is built to verify eligibility first — clean files move faster than hopeful ones. In practice, the fastest candidates aren’t the ones who rush—they’re the ones who submit a file with nothing for the DRE to question.
The 135-Hour Rule, Explained Simply
To qualify for the California real estate salesperson exam, state law requires the completion of three DRE-approved pre-licensing courses, totaling 135 hours:
Real Estate Principles (45 hours)
Real Estate Practice (45 hours)
An Elective Course (45 hours—most of our students choose Finance, Appraisal, or Legal Aspects)
Enrollment in these courses is subject to California’s minimum time-in-course rules (usually enforced as a minimum number of days per course). You cannot "crash" these courses in a weekend; the regulatory framework is designed to ensure a minimum level of exposure to the material before you are given the ability to test out.
The "Completed" Checklist
The DRE only considers a course "complete" when you have checked these three boxes:
Time Requirement: You have spent the mandated number of days enrolled in the course (18 calendar days typically).
Examination: You have passed the final exam for that specific course with a score of 60% or higher with ADHI Schools.
Documentation: You have received a formal course completion certificate or transcript showing the exact course title and your legal name as it appears on your government-issued ID.
Until you have all three certificates in your possession, you are not an eligible candidate for the state exam.
The Real Answer: "Exam Before Hours" Scenarios
Let’s break down the specific scenarios candidates use to try and bypass the timeline.
Can I schedule the exam before finishing 135 hours?
No. In California, you don’t simply call a testing center and pick a date like you would for a haircut. You must first apply to the DRE. They review your education proof, and only then do they issue an Authorization to Schedule (also known as an Exam Invite). Until you’re approved, you’re not “in line” for an exam seat.
Can I take the state exam before finishing 135 hours?
No. There is no "provisional" testing. The education is a statutory prerequisite. Without the 135 hours, you aren't a candidate; you're just someone with an incomplete application.
What if I’m 90% done with my last course?
No. The DRE does not recognize partial credit. Whether you have 0 hours or 134 hours, the result is the same: Ineligible. You must wait until the final certificate is issued before mailing your application packet.
What if my course is done, but I’m waiting for my certificate?
No. Do not mail your application with a note saying "Certificate coming soon."
What if I finished courses years ago?
Only If. In many cases, older course completion records can still be usable, but the safest move is to verify your course titles and the provider's approval status to make sure you're applying under current DRE rules. If you are unsure if your older classes still count, check our California Real Estate License Guide to ensure your education aligns with today’s standards.
The Fastest Path: The "Clean-File" Sequence
If you want to get licensed as quickly as possible, stop looking for shortcuts and follow this proven sequence. This is the timeline we see work most efficiently for our students.
Complete the 135 Hours: Finish Principles, Practice, and your Elective.
Gather Your Proof: Secure all three course completion certificates. Ensure your name matches your government-issued ID exactly.
Submit the "Combined" Application: Use form RE 435 (Salesperson Exam/License Application). Most first-time applicants should use the combined path so you don’t create a second processing cycle after passing.
The Waiting Window: Once your application is mailed, the DRE enters a review period where they process your file.
Pro-Tip: If you want the full, granular step-by-step from choosing your courses to passing the state exam, start with our California Real Estate License Guide.
What You Should Do While Waiting for Your Exam Date
The period between mailing your application and receiving your Authorization to Schedule is not "dead time." If you just sit and wait, you are actually slowing yourself down. Use this window to handle the "back-office" of your new career:
Live Scan Fingerprints:You don't have to wait until you pass the exam to do your background check. Doing it now means your license can be issued almost immediately after you pass.
Master the Material: The 135 hours of pre-licensing education is the "what." Now you need to learn the "how" of passing the exam. This is when you should be high-quality exam prep tools.
Brokerage Interviews: You can't actually sell real estate without a broker. Use this time to interview different firms. You can learn more about this by reading: Do You Need to Join a Brokerage Before Applying for a License?.
Planning Your Launch: And if you’re trying to plan the first 30 days after activation, read: What Happens After You Get Your California Real Estate License?.
Name Matching Audit: Double-check that your certificates, your application, and your driver’s license all use the same name. If one says "Jim" and the others say "James," fix it now.
3 Costly Mistakes That Will Slow You Down
1. The "In-Progress" Application
As discussed, mailing your application while still enrolled in a course is a guaranteed delay. The DRE is a high-volume government agency; they do not have the resources to "match" a late certificate to an existing file easily. Your file will be set aside, a DRE deficiency notice will be generated, and you will likely have to start the waiting clock all over again.
2. Using the Wrong Application Form
Candidates often use the "Exam Only" form (RE 400) because it's shorter. However, this means after you pass the exam, you have to submit another application for the license itself. This can add significant time to the total process. Always use the combined exam and license application to bypass that second wait.
3. Underestimating the State Exam
I've seen students finish their 135 hours, wait for an exam date, and then fail the exam because they thought the state test would be as easy as the course quizzes. If you fail, you have to reschedule and pay the fee again. This is one of the Top Reasons People Fail to Get Licensed in California.
FAQ: Your Timeline Questions, Answered
Can I apply to the DRE before finishing classes?
Technically, you can mail the form, but it will be treated as a deficient file and you’ll receive a deficiency notice. The DRE requires all three course completion certificates to be included in the initial packet to prove eligibility.
What is an "Authorization to Schedule"?
This is the document the DRE sends you once they have approved your 135 hours and your application. It grants you access to the eLicensing system where you can finally pick your date, time, and location for the exam.
How long are the course certificates valid?
Currently, there is no expiration date on pre-licensing course completions in California.
Is there any way to skip the 135 hours?
Only if you are a member of the California State Bar.
What happens if I pass the exam but haven't picked a broker?
Your license will be issued in "Inactive" status. You won't be able to perform any acts requiring a license or earn commissions until you officially "hang your license" with a broker. See What Happens After You Get Your California Real Estate License? for the next steps.
Speed Comes From Sequence, Not Shortcuts
In the world of California real estate, "slow is smooth, and smooth is fast." The desire to rush the process is understandable—this is a career that offers incredible freedom and income potential. But trying to take the California real estate exam before completing 135 hours is a tactical error that almost always backfires.
True efficiency is found in the "clean-file" sequence: complete your courses, gather your proof, and submit a perfect application. By doing the work correctly the first time, you ensure that once you pass the exam, you are ready to hit the ground running.
Next step (don’t guess):
Start here: California Real Estate License Guide
Ready to begin your courses? → ADHI Schools Pre-Licensing Packages
Choosing a broker next? → Do You Need to Join a Brokerage Before Applying for a License?
|

The "License Cliff": Why Agents Can Stall in the First 30 Days
You pass the state exam, celebrate, and then the email arrives from the DRE: "Your license is active." Suddenly, the guided path of mandatory Read more...
The "License Cliff": Why Agents Can Stall in the First 30 Days
You pass the state exam, celebrate, and then the email arrives from the DRE: "Your license is active." Suddenly, the guided path of mandatory courses and proctored exams ends. You are no longer a student with a syllabus; you are a business owner with a blank canvas.
If you aren’t careful, you can end up on the wrong side of what we call the “License Cliff”.
Without guidance or deadlines, new agents can drift into "luxury cosplay"—spending weeks on logos and business cards while their momentum evaporates. Here’s what to do after you get your California real estate license in the first 30 days to move from "licensed" to "in business."
The 30-Day Launch Sequence
✅ The Day 1–2 Checklist: Immediate Momentum
Identify 3 Brokerages: Do not over-analyze. Pick three based on proximity and reputation.
Call the Managers: Request a "New Agent Interview." Do not wait for an "opening."
Audit Your Finances: Make sure you can cover 3–6 months of dues + basic expenses.
Phase 1: The Mandatory First Step – Hang Your License
Practically speaking, you can’t operate solo in California. Your license becomes usable when it’s placed under a supervising broker. Your broker sponsors your license and provides the supervision and compliance umbrella that lets you practice.
Who is this for?
The Solo Agent: You want to build your own brand from Day 1 and keep a higher split.
The Team Agent: You want provided leads and high accountability.
ADHI Recommendation: For most brand-new agents, training beats split—by a lot. A training-heavy team environment provides the systems you need to survive Year 1.
The Brokerage Interview Scorecard
Onboarding: Is there a structured 30-day plan or just a desk?
Costs: What are the monthly tech, desk, and E&O (Errors & Omissions) fees?
Live Training: Can you shadow a listing presentation or an inspection this week?
Directive: Schedule 3–5 interviews. Your goal is a qualified launchpad for your first 12–24 months. If you’re still navigating the timing of your application, read Do You Need to Join a Brokerage Before Applying for a License?.
Phase 2: Setup Week – Activating Your Toolkit
Once sponsored, your first week is about technical setup. Avoid the "Branding Black Hole" and focus on permission-to-play tasks.
Your First 7-Day Setup Checklist
Task
Action Item
Compliant Signature
Include your Name, DRE License #, and Brokerage info (required for compliant advertising).
CRM Import
Export your phone and social media contacts. This is your "Sphere of Influence."
MLS & Supra
Get your MLS login and set up your Supra key for lockbox access.
The "Ask" Rule
Bookmark your broker's guidelines. When unsure on a disclosure, pause and ask your broker.
Phase 3: Your First 30 Days – The "Conversation Engine"
In real estate, Activity > Results. You cannot control a closing, but you can control your scoreboard.
Your First 30-Day Activity Scoreboard
10 New Conversations: Direct, two-way dialogues about the market.
5 Value-Add Follow-Ups: Sending a useful report or link (not just "checking in").
1 Hosted/Shadowed Open House: Your field laboratory for meeting neighbors.
1 Practice RPA: Write a mock Purchase Agreement using your broker’s templates.
Reality Snapshots
The “Ghost” Agent: I’ve seen students pass the exam but wait 60 days to pick a broker. By then, their momentum is dead. The knowledge from the exam has a half-life; use it immediately.
The Branding Trap: One agent spent $500 on a custom logo before their first sphere call. Six months later, they were out of the business with a beautiful, empty website.
The Open House Win: A new agent hosted an open house for a top producer. They didn't sell that house, but met a neighbor who listed with them four months later. That one conversation turned into a $25k commission.
The Top 3 Post-License Traps
"I need a perfect brand first": Your brand is competence and responsiveness. Use your brokerage's templates for 6 months while you learn the contracts.
Tool Overload: You will be pitched "guaranteed leads" by dozens of vendors. The Fix: Use only what your brokerage provides for the first 90 days.
The Expert Fear: You don't need to know everything. Your script is: "That's a great question. Let me confirm this with my broker/manager so I give you the exact answer."
FAQ
"Can I get my license first and choose a broker later?"
Technically yes, but you are losing momentum. Read Top Reasons People Fail to Get Licensed in California to see why delay is the enemy of success.
"What if I feel unprepared?"
The exam proves you know the law; the first 30 days prove you can follow a system. If you haven't finished your hours yet, check Can You Take the Exam Before Completing All 135 Hours? to speed up your timeline.
"What does my broker actually do?"
They are your regulatory partner. They review your files for compliance, provide legal contracts, and pay your commissions. They are the "adult in the room" for your professional liability.
Your Next Step
Getting licensed was the "license to learn." Now, you must execute. If you are still navigating the pre-license requirements, solidify your foundation with our complete California Real Estate License Guide.
Open your calendar now and block 9:00 AM – 11:00 AM tomorrow for "Brokerage Research and Outreach." Treat it like an appointment.
|